In this article we are going to see how to publish an app on iTunes. We will give some tips and a step by step video.
To know before publishing
Xcode and MacOS
To publish an iOS app you need a Mac computer because you must use Xcode software. Actually you can do that without a Mac computer but you have to emulate your computer to install Mac OS and then install Xcode on Mac OS. Here is an article about that:
https://www.udemy.com/blog/xcode-on-windows/
The certificates
An iOS publication under one developer account needs 4 files, one file that will sign the certificates and 3 certificates. The file that will sign the certificates and one of the 3 certificates are used for all apps published under one developer account, and the two other certificates must be created each time you will publish a new app.
The ones that are used for all apps published under one developer account:
These 2 files will be created once (the first time you are going to publish under this developer account). It is the CertSigningRequest (CSR) and the iOS distribution certificate (ios_distribution). The CSR is created from your computer (must be a Mac) from the keychain access, and the ios_distribution is created from the Member Center at developer.apple.com.
These two items must be stored in the main certificates folfer for this developer account on your computer (it will be better in term of organization if you are willing to publish other apps under this account). Thus if we consider this example, for the client named “John Doe” who has his own developer account, on your computer there will be these folders with this organization:
- IOS apps
- John Doe
- certificates –> CSR and ios_distribution for John Doe account must be stored here after you have created them
- John Doe 1st app
- certificates
- screenshots
- John Doe
You will use this CSR and ios_distribution certificate for all the apps that you will publish for John Doe, if there are several apps to publish under this account. You create once and you use them each time you publish an app for John Doe under his account. For your information, the Keychain Access to create the CSR is in your Mac in Applications > Utilities.
The two other certificates are the aps_production certificate and the Mobile Provisionning Profile. You will have to create them for each app, as you can see in the video. You will stored them in the certificates folder which is in the app folder. Thus if we consider the previous example, for the client named “John Doe” who has his own developer account:
- IOS apps
- John Doe
- certificates
- John Doe 1st app
- certificates –> aps_production and Mobile Provisionning Profile for John Doe 1st app must be stored here after you have created them
- screenshots
- John Doe
To create the screenshots
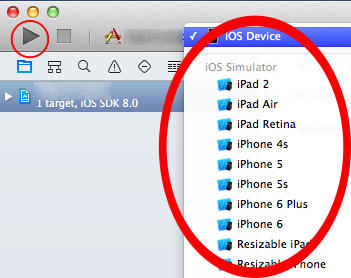
You will need some screenshots to fill out the app sheet on iTunes. You will be able to make them with Xcode and especially with the iOS Simulator delivered with Xcode. Open the Xcode project that is in the ios_source folder (see in the video when opening the project with Xcode), then choose the target, iPhone 4s for instance, and click on the Play button (For your info, the ios_sources of an app can be downloaded from its sheet from your backoffice > manage > applications):

Take some screenshots of the app for this target using CMD+S from your keyboard, and do it for each target you want screenshots. Before switching from a target to another don’t forget to click on the “stop” button in Xcode.
The Publication
How to compile an iOS app and create a .pem certificate or watch the video
